HDR Images in the Browser Using JPEG XL in Q3 2022
NOTE: this is about displaying greater-than-sRGB still images on computer displays, not the bracketing postprocessing technique that has been popular over the last decade or so.
An HDR JPEG XL image of my cat, Colby Jack. Requires JPEG XL enabled in your browser, will not display otherwise. Will look bad on SDR displays.
tl;dr
- acquire a greater-than-sRGB source image, usually a camera raw file
- generate an OpenEXR image using Affinity Photo
- convert that OpenEXR image into a PQ-mapped PNG file
- convert that PNG file to a JPEG XL file
- enable JPEG-XL in Chrome
- profit!
Requirements
- A source image with dynamic range greater than SDR
- A computer with an HDR display (I used a 2021 MacBook Pro 16")
- Familiarity with the command line, operating systems, and compiling open source software
Steps
Capture
For an HDR photo to look good, you need an HDR source. The easiest way to do this is to capture a RAW photo. Basically any recent camera will do this, including smartphones. There are various proprietary manufacturer-specific formats for this (CR3, ARW, NEF, etc) but there’s also the interoperable DNG format, which is what most (all?) smartphones will capture. Acquire a good photo in one of these formats.
Artistic Expression
Next we need to turn that undeveloped RAW file into an image file. We also need to make sure that through the entire development process, we do not lose information as transform the bayer-patterned sensor data into a beautiful image. In order to do that, we need two things: a 32-bit floating point imaging pipeline, and a screen that can display it so we can visually confirm that the image looks as we want it to. By using Affinity Photo on a 2021 MacBook Pro with XDR display, we can have both. There are other options for hardware and software, but this is what I’ll be using for the article (because that’s what I have).
-
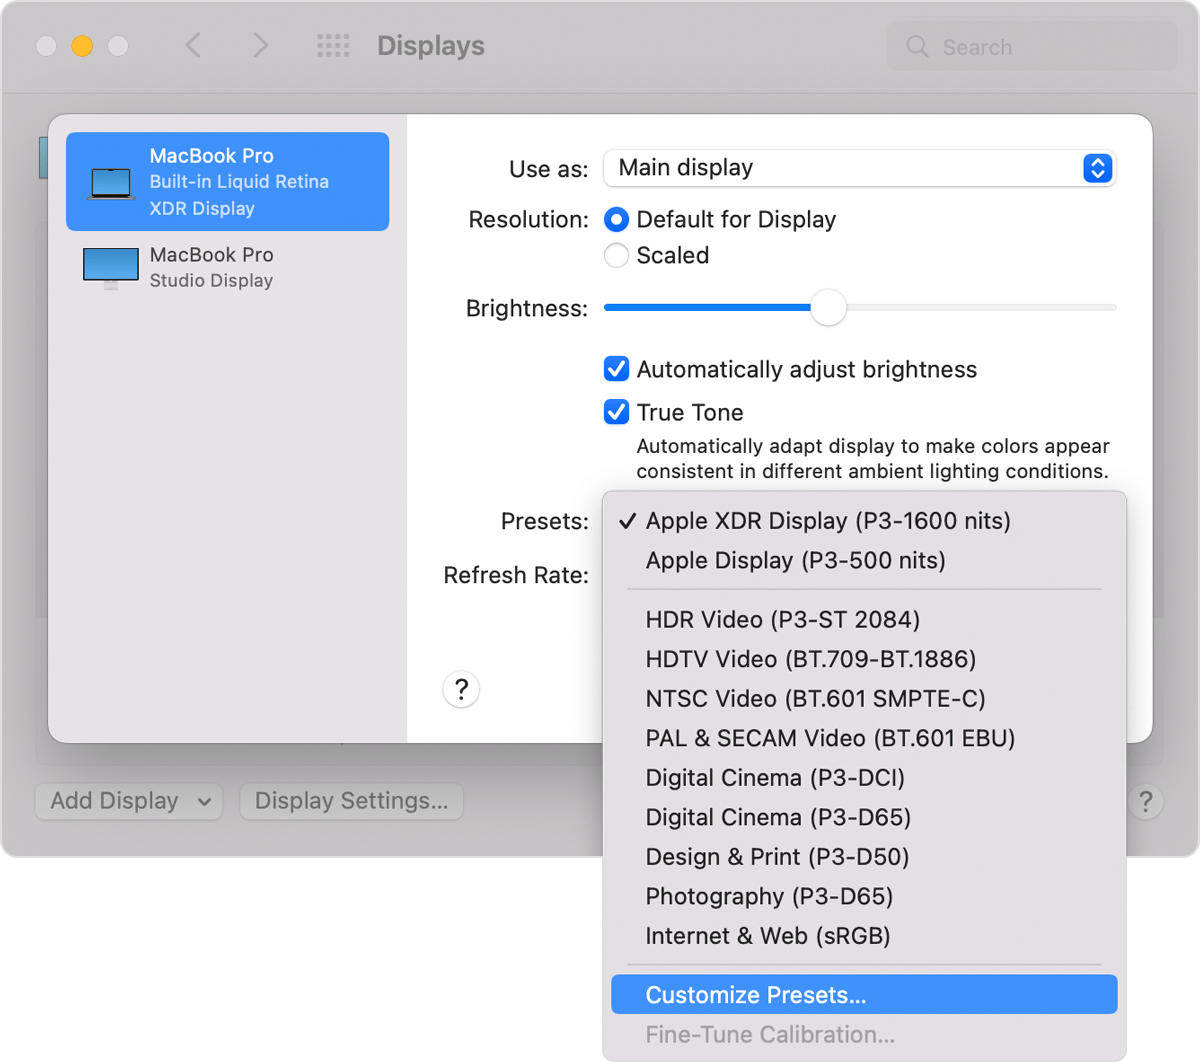
Set your MacBook to “HDR Video (P3-ST 2084)” in System Preferences in order to properly hit the 1000-nit peak brightness target.

-
Enable HDR/EDR preview by default in Affinity Photo with the 32-bit Preview Panel.
-
Follow the first 3.5 minutes of this tutorial (ignore the tone mapping bit) to develop your RAW photo into an HDR OpenEXR file:
-
Export your photo from Affinity as an OpenEXR 32-bit float file.
Encoding
First and foremost: huge thanks to Sami Boukortt for writing the tool we’re about to use here! I could not have done this without you!
-
Now we’re going to compile and use the in-development JPEG XL tools. I’m not sure if these build on macOS, I didn’t try it. What I did do was open install Ubuntu on my Windows 11 computer. You can follow these instructions.
-
Once you have an Ubuntu terminal, you can follow the compilation steps outlined in the readme file for JPEG XL. Make sure you are using JPEG XL v0.8 or greater! There’s one important change though: you need to also build the tools directory as well. When it comes to the
cmakeconfiguration, use this command:cmake -DCMAKE_BUILD_TYPE=Release -DBUILD_TESTING=OFF -DJPEGXL_ENABLE_DEVTOOLS=ON ..Make sure the config includes
exr_to_pq.Building tools: cjxl;djxl;jxlinfo;cjpeg_hdr;fuzzer_corpus;butteraugli_main;decode_and_encode;display_to_hlg;exr_to_pq;pq_to_hlg;render_hlg;tone_map;texture_to_cube;generate_lut_template;ssimulacra_main;xyb_range;jxl_from_tree;benchmark_xl -
You should now have binaries for
exr_to_pqandcjxlin thetools/directory. We will execute them in sequence.$ ./exr_to_pq --luminance='max=1000' input.exr intermediate.png The resulting image should be compressed with --intensity_target=1372.76.Take note of the intensity target here. Mine was 1372.76 for the cat image.
./cjxl --intensity_target=1372.76 intermediate.png output.jxlCongratulations! You now have an HDR mapped JPEG XL file!
Viewing
As of writing in late August 2022, JPEG XL is not enabled by default in Chrome. You can always see an up-to-date status report here, which also includes step by step instructions on how to enable the developer flag.
Once enabled, you should be able to drag-n-drop the JXL file from Finder/Explorer into your Chrome window and bask in the glory of your new photo.
Addendum
-
Once again, huge thanks to the JPEG XL developers. Check out their answers to my questions for troubleshooting tips and more context.
-
All of this song and dance may be unnecessary in the coming weeks, because I’m thrilled that Adobe, Intel, and VESA all weighed in on Chrome’s bug tracker voicing support and imminent release (!) of JPEG XL tools.